Showing posts with label Backpacking. Show all posts

Saturday, February 6, 2016


Check out the full video review here

We've said it before and we'll say it again. Having the right gear makes all the difference in your backcountry experience. Black Diamond has been a leader in the climbing and ski industry for many years now, but even the products directly unrelated to skiing and climbing they excel at. The Orbit Lantern is the perfect example of functionality and reliability when it comes to needing light around camp. 

Weighing in at 2.9 ounces without the batteries, it is an impressive little light that gives off 105 lumens of light. With the ability to dim the light by the press of a button, you are able to secure over 70 hours of usable light. New for 2016, the Orbit has dual function as a lantern and a flash light. They have embedded a 50 lumen flash light into the base of the lantern giving you even more versatility for your evening adventures. 

We love to hang the Orbit from the gear loops in the tent and use it for easy reading, getting changed, or simply to play a round of cards on a dark stormy night. Needless to say, the Orbit is a great option for any backpacker looking for a little more functionality over the standard headlamp. No blinding your friends with this when in the tent, like you would with a headlamp. 

Happy Trails my friends!

Black Diamond Orbit Lantern Review - Backpacking Lighting
Saturday, February 06, 2016

Black Diamond Orbit Lantern Review - Backpacking Lighting

Tuesday, February 2, 2016

Video information here: Sierra Designs Nightwatch 2

When Sierra Designs rebranded and made some major adjustments to their products a couple years ago, they reintroduced themselves back into the spotlight of innovation and smarts for the everyday outdoorsman. For the backpacker who isn't concerned about going ultralight, the Nightwatch 2 person tent is a great addition to the Sierra Design line up of tents. 

Overview:
A room with a view! The Nightwatch tent is new for Spring 2016, allowing the user to roll back the rain fly exposing the stars and creating awesome ventilation, yet keeping you away from the bugs. 
Sierra Designs has made some major adjustments that give them an edge and separate them from the highly competitive field of outdoor recreation. Introducing the awning style rainfly and removing the traditional vestibule is the noticeably major difference in the new Sierra Designs tents, but there's so much more. Ultimately focusing on the end user helps them stand out above the rest of the competition. 

Nightwatch 2 Features:
When Sierra Designs rebranded they made changes to the design that every other company has been doing for years. Removing the traditional vestibule to make the entry to the tent more inviting and less awkward. We've all been in a tent where it's raining, you've zipped shut the vestibule keeping you out of the rain, but you find yourself adjusting your backpack stashed under the vestibule making sure it's not getting wet. 

Sierra Designs has solved the issue with this, creating gear closets accessed from the inside of the tent removing your gear from the door of the tent. The other benefit of removing the vestibule is the ability to slightly zip down the window giving ventilation and being able to look outside and see what's happening. 

The other main feature of the Nightwatch tent is how it gets its name. Being able to roll back the rain fly exposing the night sky and creating excellent ventilation. This feature is important because one might argue how it differs from other tents. Being able to keep the rain fly attached and quickly rolling the fly down in inclement weather, rather than looking for a place to stash the unattached fly and scrambling when weather arrives. 
The Nightwatch 2 also features 2 additional small doors the act as doors when the rain fly is rolled back, or as access to the gear closets when the fly is fully attached and covering the tent body. 

Technical Specs: 
Minimum Weight: 4 lbs, 7 oz
Packed Weight:  5 lbs, 0 oz
Internal Peak Height: 43.5 in
Interior Area: 30.50 ft

Overall this tent is a well designed piece of equipment that any backpacker would be happy with. There are some drawbacks to the design that may not suit a few people too well. A valid concern is dragging muddy, wet boots through the tent to place in the gear closet. The drawbacks around the design are minimal to the overall benefits of how it creates a better outdoor experience for the everyday backpacker. 


Sierra Designs Nightwatch 2 - Room With A View
Tuesday, February 02, 2016

Sierra Designs Nightwatch 2 - Room With A View

Sunday, January 24, 2016


What do you think about when you hear the word Hammock? It's probably coupled with words like solitude, relaxing, and comfort. Hammocks seem to be on the rise as a great backpacking addition or replacement to a traditional tent. All over YouTube you'll find outdoor gear channels talking about camping with a hammock and how to sleep comfortably in a hammock. Are all hammock's the same? Will you get the same level of comfort from any hammock you choose?

These and other questions are something to think hard about when it comes to whether or not your body is going to be able to recover after many miles of hiking. Here at Backcountry Exposure, we've been doing a lot of research on the various popular hammock systems available. We've been able to spend time with a few options, and have set our hearts on the Wildhorn Outfitters Outpost Hammocks and the included Litespeed Suspension System. For the price and what is included, you just cannot beat the setup that Wildhorn has put together.

Lets face the facts here people. A camping/backpacking hammock made from nylon is the standard across all companies whether it's Hennessy, ENO, Grand Trunk or any other. They all feature high quality triple stitching at the seams, and have a gathered end with a loop of some kind of cordage or dynema material with a biner or loop system. Then there's various tree strap suspension systems that are available, whether it's simple 1 inch webbing you purchase on your own, or sophisticated straps like the Atlas straps from ENO. All of the options on the market though don't hold a candle to the ease of use and simplicity that is the Litespeed System.


The Litespeed tree straps and suspension system is so easy to use it takes what feels like seconds to setup. The gathered end of the hammock is put together with Amsteel and wrapped around a metal cinch buckle. 200 pound rated nylon straps, 11 feet in length are fed through the buckle making it a simple grab and pull to tighten. So easy that you may question if you did it right, but don't worry, it's right and it's awesome!

The Outpost hammocks come in two sizes, the Outpost 1 a single and the Outpost 2 a double. Both of them are 11 feet in length but are different in width, with the Outpost 2 being 6'4" wide, it's plenty big for two people to hang, or for sleeping.

If it we're me buying a new hammock or my first time buying a hammock, my recommendation would be the Outpost before looking at any other options. It's a great product at a great price!


Wildhorn Outfitters Outpost 2 Hammock Review
Sunday, January 24, 2016

Wildhorn Outfitters Outpost 2 Hammock Review

Sunday, January 17, 2016


I feel like I say this all the time, but having good, high quality gear, makes all the difference when going, hiking, camping, or backpacking. There are endless options for outerwear for the outdoor enthusiast, but few companies are capable of creating outerwear the way that Arcteryx does. In this review, we introduce the Arcteryx Gamma LT Hoody, a light weight, breathable technical softshell, perfect for your everyday outdoor activities. 

I recently bought this jacket to add to my ever growing list of technical jackets. Arcteryx is a brand i've known for a long time, but have not owned until this year. But I am overly impressed by the jacket and know that it will be one of m favorite for a long time. 

Some specifics about the Gamma LT Hoody that make it a quality jacket. The Gamma LT has a really nice brushed soft shell fabric that creates a high level of durability, that also gives confidence that the jacket will last a long time. Arcteryx has made some improvements to the sleeves and created a nice stretch gusset that stays tight around a pair of gloves, but allows for proper stretch. No need to worry about a velcro sleeve to keep tight around the wrist. 

The hood of the Gamma LT is also very well designed. Large enough to wear with a helmet on for ice climbing, but incorporates the proper elements to make the hood fit snug on the head when not wearing a helmet. The Gamma is also the perfect soft shell for layering a light weight synthetic or down jacket underneath for added warmth. 

Really, the Gamma LT Hoody is the perfect soft shell, that will not only keep you dry, but will protect you from the wind, and it looks good. I mean, you gotta look good when out in the backcountry, right?!

Arcteryx Gamma LT Hoody - Gear Review
Sunday, January 17, 2016

Arcteryx Gamma LT Hoody - Gear Review

Sunday, January 10, 2016


A good base layer? Seems like everywhere you go to find a good base layer you have what seems like hundreds of choices and dozens of brands. To be quite honest, I am kind of a gear snob and end up paying more for a piece of outerwear than I probably should be. However, i've learned that paying good money for a piece of outerwear really is, you get what you pay for. I've found that to be the case with the Rab AL Pull-on base layer. I bought two of these a few years ago, and it's been worn more times than I could count. I feel like so many of the photos from my backpacking, climbing and hiking adventures I am wearing this base layer. It really is my go to base layer. 

With all that aside, lets get into what I love about this piece of clothing. The AL Pull-on is made from the Power Dry fabric by Polartec. A great wicking fabric that breathes incredibly well when worn right next to skin, and yet keeps the body warm. This particular base layer is a half zip that makes regulating temperature a breeze. 

I've worn this layer so much that it's become a staple to my backcountry outerwear. Not only is it extremely comfortable and fits well, it's been a reliable layer that i've always counted on. In March 2015 I wore this layer on a six day backpacking trip through the Paria River Canyon. Basically it was the perfect light weight, base layer that made sure I didn't get too much sun on my neck and arms, and yet kept me cool when in the sun, but also warm in the cold shadows of the canyon. 

If you are in the market for a great base layer, this is one to make part of your gear list.  

Rab Equipment - AL Pull-On - The Best Base Layer
Sunday, January 10, 2016

Rab Equipment - AL Pull-On - The Best Base Layer

Saturday, December 5, 2015

If you are going to be doing what I call, destination backpacking, then having a good day pack to bring along is a necessary item. Lets say you are going to backpack several miles into an area of lakes that are within pretty close proximity to each other. You camp at one of the lakes, but you want to see the others. You are unlikely to pack up your 60 liter pack for a simple day hike. Why not take something so light and small that you almost forget you have it. 

The Sea To Summit Traveling Light Day Pack is the perfect option for a light weight, simple day pack. Weighing in at only 2.4 ounces, it takes up virtually zero space in your pack, and makes the day hikes more enjoyable. 
The good about this pack i've already mentioned. It's small, light weight, and is easy to carry. It's roughly 12 liters in capacity, so you can load a bunch of stuff in it, but be careful. The shoulder straps are nice and wide, but if you load it with more than 8 pounds of stuff, then it's going to get a little uncomfortable. The straps have zero padding in them and they can collapse into a smaller strap when too much weight is put into the pack. Be smart and don't carry more than you need. 

Made from high quality, ripstop, sip nylon, it's tough, light weight, simple and the perfect addition to your backpacking system.

Sea To Summit - Traveller Light Day Pack Review
Saturday, December 05, 2015

Sea To Summit - Traveller Light Day Pack Review

Monday, November 23, 2015


One of my favorite things about backpacking is the preparation that comes with the anticipation for a trip. I remember getting prepared for my trip down The Paria River with a school class. That trip involved a lot of planning, preparation and mental preparation. Knowing how to get ready for backpacking experiences is vital to whether or not you enjoy yourself out on the trail. 

This has lead me to create a series of videos to share with you all about the Essentials of Backpacking. Everything from gear to use, what to buy, and even the ethics behind being a good person in the backcountry. I love to share my knowledge with people and look forward to seeing the evolution of this series. It will primarily be contained on my Youtube Channel, but I will update with each video here as well. 


Backpacking Essentials - Backcountry Exposure Youtube Series
Monday, November 23, 2015

Backpacking Essentials - Backcountry Exposure Youtube Series

Wednesday, November 11, 2015

Here in the Wasatch Mountains of Utah we just received our first blanket of snow. It seems a little odd to be reviewing a hammock in November, but when a really awesome new product comes out, you have to share the love.


Wildhorn Outfitters Outpost 1 Hammock

I am fairly new to the whole Hammock epidemic that seems to be overruling the photo world of instagram, but when a new product comes out that changes your perspective on the product in general, you pay attention. 

Wildhorn Outfitters is a new company to me, but they are doing awesome things to improve products in the world of the outdoors. What they have done to the hammock world is, in one word, AWESOME!

After doing a bunch of research and from previous experience with other hammock companies, there's a few things that Wildhorn has done that makes their product stand out among the others. 

- Litespeed Suspension System: Of all the research that i've done on other hammocks that fall into the same category, none of them have a strap system as good as what Wildhorn has done. Not only are the straps included with the hammock, but they are incredibly bomber. They use amsteel cord to attach the hammock to the tree straps. Amsteel is incredibly strong and is super light weight. The Litespeed straps are 11' long and have a cold rolled steel cinch buckle that showed zero signs of slipping when weight was put on them. The straps also include a 12kn rated wire gate carabiner to attach the strap to a tree, post, or whatever you attach it to. This is the biggest win on this hammock. 

- Length of the Hammock: The hammock is 11' in length, which compared to the ENO Single Nest Hammock is over a foot longer. Why is this important? Having more fabric on hammock allows you to lay flatter after setup. This just simply makes the hammock more comfortable. 

- Light Weight: The Outpost hammocks are made from 100 percent ripstop nylon. The Outpost 1 comes in at just under 3 pounds. 3 Pounds for a hammock is light enough to take backpacking and camping. 

If you're looking for a hammock to add to your gear stash, this is the hammock to buy!
You can get yours here: Outpost 1 Hammock


Outpost Hammock Review - Wildhorn Outfitters
Wednesday, November 11, 2015

Outpost Hammock Review - Wildhorn Outfitters

Saturday, October 31, 2015


Fall is easily my favorite time of the year. Seeing the changing colors of the trees and watching the earth change as it gets colder is something that has always fascinated me. I find my excitement for being in the mountains goes out of control when that first touch of cold hits. 
Three weeks ago, my wife and I welcomed our beautiful little girl into the world. Maylin has become our world and we are beyond excited to share our love for the outdoors with her. 

A few days ago we made an impromptu decision to jump in the Jeep and go for a drive up the Mirror Lake Highway. We thought we would also go for a hike if the weather was good enough, but that quickly changed as we watched the temperature drop slowly as we drove higher and higher. So instead of hiking, we stayed in the car and made some stops along the way.

Mirror Lake Highway is a great place to go for easy access to great day hikes, beautiful overlooks, and an opportunity to see wildlife. One of the more popular locations to stop at is Provo River Falls.


There is a nice view point that overlooks the falls, but you can walk down to the water with ease and dip your feet in the water to cool off on a hot summer day. 

After stopping at Provo River Falls, keep driving east and you'll start gaining elevation quickly, and you come to my favorite place on the highway. Bald Mountain Pass sits at just over 10,500 feet and is one of the highest places in Utah you can drive your car. Make sure to stop at the pass and take in the view looking west. If it's a nice clear day you can see the East face of Mount Timpanogos. 

There's no doubt that the Uinta Mountains are a great getaway. Whether it's for a multi day backpack trip or a day driving in the car. It's just nice to get out and enjoy. 


Uinta Mountains In The Fall - Mirror Lake Highway Adventures
Saturday, October 31, 2015

Uinta Mountains In The Fall - Mirror Lake Highway Adventures

Friday, September 18, 2015


The High Uinta Wilderness is one of my favorite places to visit, and having it so close makes visiting simple and convenient. This year my wife and I are expecting our first child, and I wanted to make sure I got out backpacking enough times over the Summer knowing that the Fall and Winter seasons would be filled with a different priority.
I rallied some friends of mine and we originally planned to hike into Red Castle, but quickly changed plans because I didn't want to be too far away from Katie, with her being 9 months along.

Instead of Red Castle, we decided to go a shorter distance and see what Packard Lake was like, off the Highline Trail. All I can say is I was pleasantly surprised at how beautiful and amazing this area of the Uintas is. So lets get into the details.

Packard Lake is located about 4 miles from the Highline Trailhead off the Mirror Lake Highway.

The Highline may be the most popular trail in the Uinta Wilderness. It basically cuts the range in half and covers over 50 miles of terrain. The west side of the highline is vastly different than the east side, but both boast beautiful views and high elevations.

Getting to Packard is moderately difficult. Any seasoned backpacker would see this as an easy hike, but someone new to backpacking would need to take some extra time as there's a good amount of elevation gain and loss after you leave the highline trail and branch off towards Packard. You'll start from the Highline Trailhead and after about 2.2 miles you'll be passing Scudder Lake, which is the first lake you see as you hike. Another .8 miles and you'll come to the Packard Lake junction on your right. The sign for the junction is posted on a large tree and you cannot miss it. From there, be ready to go up and down several times. There are some steep sections that will leave a new backpacker needing to stop for a breather.

There are three lakes after you take the right at the junction and head towards Packard. The first you come to is Wilder. It's a beautiful setting and has some great camping, but I suggest moving onward. After some steep trail and following a ridgeline you descend and come to Wyman Lake. Wyman also has some great camping, and a beautiful sight next to a classic Uinta bubbling brook. Again, a stunning view and area, but keep walking another 10 to 15 minutes and make your way to Packard. There is a beautiful meadow just before you head east toward Packard Lake. Stop and enjoy the view and hope to see some deer hanging out.

As you come up to Packard, which is the largest of the three lakes, you'll notice that you are right up against a ridgeline. As seen in the title image of this post, the lake sits against an amazing overlook of the Duchesne River. You'll see a waterfall, cliff band, and big open skies. It's absolutely beautiful! As you approach the lake, the best camping is on the right side between the canyon overlook and the lake. It's obvious that this is a popular place for scout troops to come, as it's only 4 miles of hiking. There's good spots, but we found a great, quiet spot nestled back in some thick trees further back along the lake shore. Let the scout troops coming in to kill your quiet solitude take the large open, over used spots close to the outlet of the Lake.

The fishing in Packard was not the greatest i've seen in the Uinta Wilderness. I tried using a fly and bubble, switching between red and yellow humpies, to mosquitos, to renegades, and the Brook Trout in the lake would not take the bait. Jakes Spinner Lures are probably your best option for this lake.

This particular trip was one of the most relaxing backpacking trips i've ever had. But it also came with some frustration. I've spent a lot of time focusing on Leave No Trace as i've been in the backcountry, and try hard to not overdue it, but was displeased with how the area was littered with numerous unnecessary fire rings in such odd and obscure locations. Trash, and the occasional spool of old fishing line spread across the lake shore. Please be responsible when out in the backcountry and Leave No Trace.

I highly recommend this as a great option for a one or two day trip. Access is great, the views never disappoint, and the atmosphere of the lake is enough to make you feel like you are hundreds of miles from any other person on earth.


Packard Lake - High Uinta Wilderness Backpacking
Friday, September 18, 2015

Packard Lake - High Uinta Wilderness Backpacking

Saturday, May 30, 2015

I have spent several nights using this bag before I decided to do a review of it. Well... it's a bag that will not disappoint. Nemo has added some amazing features to the traditional mummy bag style that makes this bag non-traditional.

Top 3 Most Important Features:

- Spoon Shape: We all know that having room to move around in your sleep is important to making your night of sleep more comfortable. Well the spoon shape achieves that need. With added space around your knees and elbows, side sleeping is amazing!

- Baffled Blanket/Comforter: This is my favorite feature! The ability to have some comfort from home in your sleeping bag. Pull the baffled blanket up around your neck and tuck yourself in for a night of cosy sleeping.

- Pillow Pocket: I know it saves weight, but lets be real here guys, no one likes to sleep on their clothes and try to find a comfortable hole in your hiking shorts and jacket to act as a pillow. Just stop it! The pillow pocket allows you to put a backpacking pillow in the hood of the bag, and it stays there! No more sliding off the pad, no more having to unzip half way through the night to fix your "pillow". I love to sleep on my side, and the hood is big enough that I can tuck my hand up in the hood on the pillow and sleep more comfortable.

This bag is filled with 700 Down Fill with a dry treatment in the footbed of the bag. It comes in at 2 pounds, which is nice for a sleeping bag of this size.


Nemo Nocturne 30 Sleeping Bag Review - Spoon Shaped Love!
Saturday, May 30, 2015

Nemo Nocturne 30 Sleeping Bag Review - Spoon Shaped Love!

Thursday, May 14, 2015

In the last few years there has been some real changes in sleeping bag designs. The traditional mummy bag seems to be an old concept of how to stay warm and comfortable in the backcountry. I spent an hour the other day watching a live event from Sierra Designs. Which was awesome!

If you haven't been paying attention to the outdoor industry, there's this awesome thing happening with several companies, and Sierra Designs seems to be on the front end of innovation and design. This Sierra Designs live event was all about sleeping comfortable in the backcountry. This is one thing that I love about their company, and allowing the public to see new product and see discussions on product is really cool.


Now to how we actually sleep comfortable in the backcountry, whether in a tent, under a tarp, or under the stars, there is bit of a process to staying warm and comfortable. In the live event, there was a lot of discussion about what to place under your body from ground tarps, to even placing your pack under your feet. The pack under the feet I didn't really understand, nor really see how that makes you more comfortable, but to each their own.

Here's a five things that i've learned to do, to stay warm and comfortable in the backcountry.

1) Stopping the cold from the ground, coming through to your back.

This is something that may be more important than a nice down bag to sleep in. Here's a scenario. It's fall, and the temperature at night gets into the 30's when you're up in the mountains. The ground is going to get cold, and without something to protect you from the ground, you're going to be cold.

The fix? A nice pad, that actually has some kind of R value for insulation.
The cheap option is to get a closed cell foam pad that has a high R value, like the Z Lite from Thermarest. The downside to a pad like this is how much space it takes up. Not ideal.


The best option is to get a pad that gets your body off the ground. A pad that inflates like the Thermarest NeoAir is an ideal pad. It delivers an R value of 3.2, and is wicked comfortable, packs down incredibly small, and weighs only 12 ounces. Or spend a little more money and get the NeoAir Xtherm, which boasts an R value of 5.7.


2) A Down Fill Sleeping Bag

You could go on and on about sleeping bags, but here's the abbreviated story. Find a bag that has a high fill power, and allows you to move around in the bag. For me this comes down to two options. I've completely abandoned the traditional mummy bag and transitioned to bags that allow more movement when sleeping and while sitting around in the tent during a storm.
Option 1: Sierra Designs Backcountry Bed
Option 2: Nemo Equipment Spoon Shape Bags

Nemo Nocturn 30

Sierra Designs Backcountry Bed


The reason i've opted for these two bags is simply for the comfort. The Nemo bag follows a mummy bag style, with a full zipper down the side, but with the spoon shape, it opens up the bag to be incredibly roomy and comfortable. The other thing that I love about the Nocturne is the "blanket" at the neck that allows you to basically tuck yourself in like you would with a comforter. It's the little things!
The Backcountry Bed just by looking at it shows what being comfortable really is about. With a completely zipperless design, the bed allows you to pull the sewn in quilt over you for full coverage, or pull it down to vent. It's wide, and has a sleeve to slip your pad into so the bed stays put when moving around.

3) A Pillow!

I've never understood some of the ultralight concepts that include putting clothing in a stuff sack and hoping the "stuff" moves into the right spot for your head, and is actually comfortable. You wouldn't do it at home, so why do it after you've hiked miles with 40-60 pounds on your back, to just lay your head on the button of your shorts. Invest the $40 on a inflatable pillow, or a down fill backpacking pillow. They weigh very little, and you can stuff them into your sleeping bag compression bag to save space.

4) Hand Warmers in your sleeping bag.

If you are spending a few cold nights in the mountains, being a little warmer makes a big difference. Being warm ultimately results in being more comfortable. I like to open one or two hand warmers and put them in my sleeping bag. I'll throw one down by my feet and put the other by my chest. It takes that little bit of chill that comes when a zipper comes undone, or your feet fall off your pad and are on the ground.

5) The pre bedtime dance...

Again, this is a little trick that i've learned over the years of backpacking. There's the little tricks that you learn about putting on clean socks, wearing an extra layer, wearing a hat, since most heat escapes from you feet and head. But here's a reality moment. Sleeping bags are like coolers. Whatever you put in that's cold is going to be insulated and stay cold, and whatever is hot, will stay hot. If you get into your sleeping bag cold, then you are most likely going to stay cold for most the night. So I like to do a little dance before bed, whether it's jumping jacks, running in place or, doing the Napoleon dance, it gets your blood pumping and will help you get more comfortable and stay warm through the night.

Have other suggestions for staying warm? Leave them in the comments!

The Sierra Designs crew during the live event.


5 Tips For Sleeping Comfortable In The Backcountry
Thursday, May 14, 2015

5 Tips For Sleeping Comfortable In The Backcountry

Thursday, May 7, 2015

"May your trails be crooked, winding, lonesome, dangerous, leading to the most amazing view. May your mountains rise into and and above the clouds." 
Edward Abbey

The Paria River Canyon is an area of Utah/Arizona that i've always wanted to visit, but never took the leap to make it down there. You hear about Buckskin Gulch all the time and how beautiful it is. Well I finally got the chance to go after putting in a suggestion to one of my school professors. I am a student at Utah Valley University studying Outdoor Recreation Management. This class that I took is an Outdoor Leadership class, focused on teaching leadership skills and group management in the field. A challenge I was looking forward to. 

This class involves a six day backpacking trip during the month of March. I was beyond excited about going on this long of a trip. 

The Route: Whitehouse Trailhead south to Lee's Ferry

Day 1 - We arrived at the trailhead and would spend the first night at the trailhead. We had a few hours to kill before we needed to setup beds for the night and get ready for the first few miles of hiking in the morning. We played Bocci Ball next to the river and threw rocks at sticks. You know, what all people do to kill time.


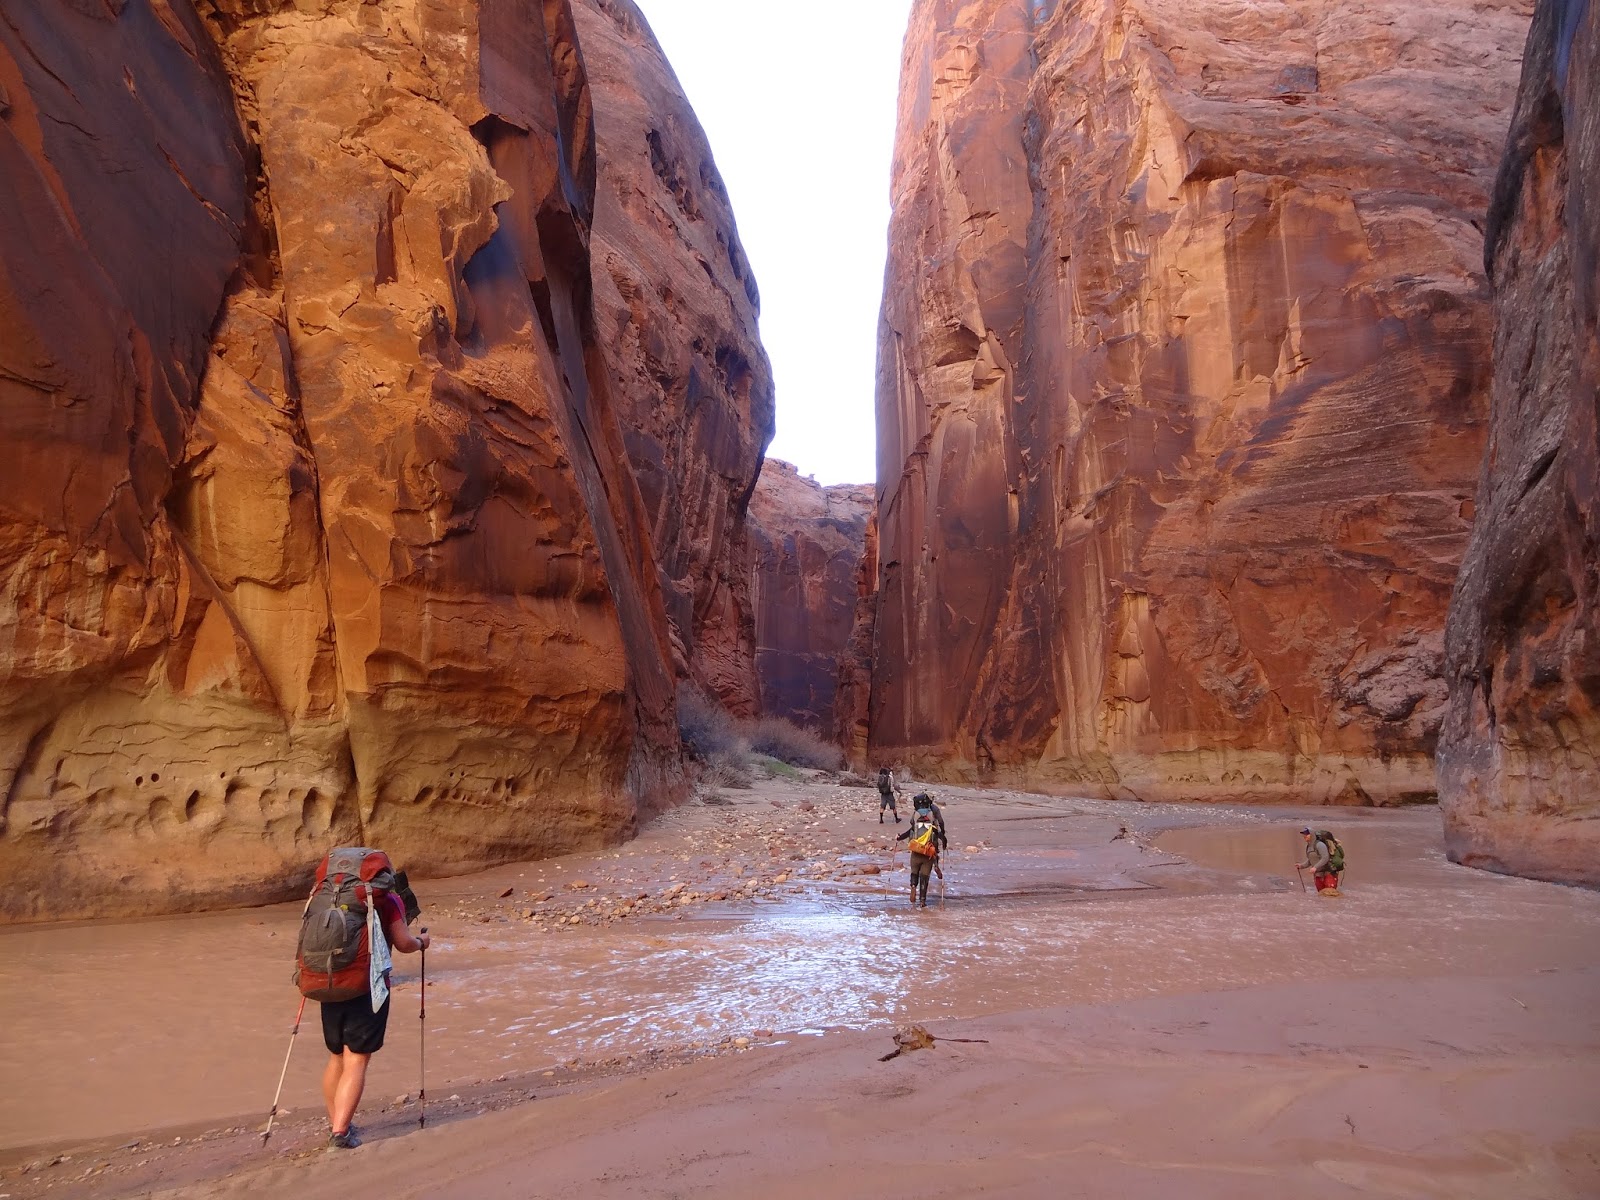
Day 2 - The adventure begins. Adventure is the right word for this day because a lot happened on the first day of hiking. We had a lot of ground to cover, as the first night on the trail would be at the confluence of Buckskin Gulch and the Paria River. The water level at this time of year was at an abnormally high level. The week prior to our departure, the water discharge level at Lee's Ferry was over 200 cubic feet per second. In other words, too high for anyone to hike down. Water level when we got there was mostly never above our knees at the highest, and we were prepared however for lots of time in the water. 

Our first ten seconds on the trail involved a river crossing, and over the next mile we either crossed the river at least eight times, or walked in the water cause the walls of the canyon were surrounded by sloppy mud. The mud would become our enemy for the next four days. After several miles we entered the narrows of the canyon. In some areas of the canyon, the walls are maybe ten feet apart from each other. A truly beautiful sight!

By this time it was getting later into the afternoon, the time we call the witching hour (5pm) was soon approaching. We entered a spot of the trail where we had to truly get wet. 


Excuse the language - it was cold and miserable!

We had hiked almost 11 miles at this point in the day and we were tired and cold from being in the narrows of the canyon for so long. Through much of the narrows we were hiking in water up to mid thigh and then we came to a section where we had no choice but to get wet. A depth we referred to as nipple deep. I went through and was soaked, and the remaining seven of us all had to go through too. If you've never been in a situation like that, then it's hard to understand. This is a level of discomfort and moral destroyer like no other. The water temperature in the canyon at this point was maybe 40 degrees. This is where everything changed.

We started hiking as fast as we could to get to the confluence of Buckskin and see if we could camp in the one spot that is a few hundred yards up Buckskin Gulch. About 1/4 mile from the confluence, Betsy, our professor lost her balance after one of her trekking poles sunk into the mud. She took a full on swim and was wet from head to toe. Once we got to the confluence, the water and wind coming down the canyon was so incredibly cold. One of the people in our group had a thermometer and dipped it in the water. It was 34 degrees! Luckily the one camp spot was available and we dropped our packs and stripped down to get into some dry clothes, get warm and cook dinner. What was one of the most amazing days of hiking, was also one of the most miserable and cold experiences of my life.


Day 3 - This class two years prior to this trip, went on this exact same trip, and the plan for day 3 is to not cover as many miles because the plan is to hike up Buckskin Gulch to the rock fall a few miles up the canyon. We got up, and to be honest, the thought of taking off nice warm thermals and putting my wet shorts and wet cold shoes back on was far from anything any of us wanted to do. Once we had packed up camp we as a group decided that we would try to hike up Buckskin. Now you should know that most of the time, there is no water running through Buckskin. It's for the most part a dry canyon unless there's been a lot of rain and later in the year is better to hike Buckskin. There however was shin height water running down the canyon and it was soooo cold! I know I sound like im complaining a lot, but it was something i'll never forget.

We started hiking up Buckskin and within minutes we couldn't even feel our feet. It was apparent we weren't going to make it very far up the canyon. We came to a spot where it got super narrow and we used a trekking pole to see how deep the hole was. We were unable to find the bottom of the hole with the pole. So instead of going swimming again, we opted to turn around and start heading back down the Paria and see if we could find some sun to soak up.

This section of the Paria is probably the most beautiful given the features that are in this layer of rock. The walls are incredibly narrow, and the hiking is amazing. Because there was so much water in this section, we had to hike in the water for several miles, with an occasional rocky/muddy shore to get out of the cold water. We planned to hike five miles this day and camp at the next reliable spring.

One of the students, Smitty, in this section was hiking close to the side of the wall and ended up getting stuck in some quick sand, which also meant he went swimming up to his chest. A great way to start the day.

After covering the miles needed, it was time for us to find a place to camp. We had been hiking kind of in a slingshot method with a group of guys that were down there. They found a place to camp before us, and it would have been ideal for a large group. But we pushed on a little further to an area that was in the sun. Dropped our packs and started cooking dinner.

Lots of water in Buckskin Gulch
Found a low spot of water in Buckskin


Sections like this were fun because you never knew how deep the water was, or where the holes were.

Days 4-6
The canyon starts to open up at this point. There are still really tall walls, but we had left the narrow sections and the layers of sandstone start to change by this point. On this day we dropped our packs when we got to what's called, The Abandoned Meander, which is a small canyon that the river at one point ran through, but doesn't any more. This little canyon was absolutely beautiful and is worth the trek up into it. There's really beautiful, lush vegetation and at the right time of day, it glows from the sun.

The hiking at this point in the trip was just tiring. My shins and the muscles right below my shins were beyond sore. We had crossed the river probably 100 times by now and each day started off with a river crossing. What a way to start the day, get your feet wet and cold. On either side of the river was several inches of thick, sticky mud, which I attribute the sore shins to.


The below photo is one of my favorite from the trip. Here is the group all together, I knew very little about each person in this group before we left, and after 6 days on the trail with them, there was a respect for each person that wouldn't have been there if we hadn't been on this trip. I remember walking through the river at this bend in the canyon, and I looked behind me and the light in the canyon was glowing, the rock was glowing, the river was glowing, and it was kind of a magical moment. I had to take a few seconds to just stop and appreciate the absolute beauty. It was then that I requested we all get together and get what would end up being the only group shot of the trip.
The photo doesn't do the light justice, but you can appreciate the beauty.


Trail to Wrather Arch
Wrather Arch
Selfie Time!


What's amazing about the lower sections of the canyon is how fast the landscape changes. I think you hike through three different layers of sandstone through the lower 15 miles of the canyon. It's truly an amazing place though. We camped at obvious camp sites each night, which were convenient to good springs. Because of a knee injury, our pace the last couple days was much slower than anticipated, and the last night of camping was at Wilson Ranch, which if you end up having to camp there, we did find water from a spring at the ranch.

An incredible trip that was highly anticipated for many weeks leading up to it. Even though it was my first experience using WAG bags and having to carry all that extra weight, I wouldn't trade the experience gained in that canyon for anything else. Friendships were made and an appreciation for the wildness of the area will stay with me forever.


Hiking The Paria River - Buckskin Gulch - March 2015
Thursday, May 07, 2015

Hiking The Paria River - Buckskin Gulch - March 2015